Manufacturer · Fashion & Home Accessories


Contents
Eyelets manufacturing involves several consecutive stages: selecting the metal strip, cutting blanks, drawing and shaping the neck in several press steps, stamping the washer, cleaning and polishing, electroplating, and checking dimensions and finish. Every stage affects how firmly the eyelet will hold in the fabric and how long it will keep its colour – which is why it pays to know how an eyelets manufacturer works before you order eyelets wholesale.
Eyelets manufacturing – the stages in brief
- selection and preparation of the metal strip;
- cutting round or oval blanks;
- drawing the neck and forming the flange;
- punching the centre hole;
- stamping the washer in a separate process;
- cleaning, polishing and degreasing;
- electroplating, paint or lacquer;
- checking dimensions, finish and setting;
- counting and packing by batch.
1. Material – where an eyelet begins
Eyelets are made from thin metal strip wound on a coil. Most often this is brass – an alloy of copper and zinc that is ductile, draws easily, does not rust and takes finishes well. Polkom's standard eyelets are made of brass. Eyelet production in general also uses steel, which is more economical but needs good corrosion protection, and aluminium, which is light and suits large technical eyelets and products where weight matters.
The thickness of the strip is chosen according to the size of the eyelet and the load: thin strip for fine eyelets for cords and thicker strip for eyelets for tarpaulins, awnings and bags.
2. Blanking and drawing
The metal strip is fed into a press that cuts a round or oval blank. In the following steps the blank is drawn – the metal is gradually formed into a cup, which becomes the neck of the eyelet. Drawing is done in several consecutive operations, because if the metal is stretched all at once the wall thins unevenly and cracks during setting.
3. Flange, hole and neck
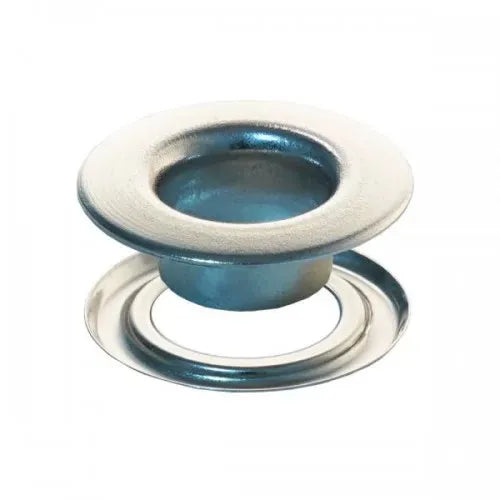
After drawing, the bottom of the cup is punched and the upper edge is spread into a flat ring – the flange. The flange is the visible face of the eyelet, while the neck is the part that passes through the fabric and is rolled over when setting. The neck height must match the thickness of the material: one that is too short does not grip, and one that is too long folds unevenly.
4. The washer – a separate but equally important part
The washer is stamped separately, from the same or a similar strip. It sits on the reverse side of the fabric and spreads the pressure during rolling, so that the eyelet does not cut through the material. That is why the eyelet and washer are produced and checked as a set – even a small difference in the inner diameter leads to a loose setting. Eyelets with and without washers are explained in detail in the eyelets category.
5. Cleaning and polishing
After pressing, machine oils and microscopic burrs remain on the edges of the parts. The eyelets are degreased and polished in barrels with abrasive media. This makes the edge of the hole smooth so that it does not cut the cord or the lace, and the surface is ready to take the finish evenly.
6. Electroplating, paint and lacquer
The colour of the eyelet is created by electroplating – a thin metal layer deposited electrochemically – or by painting and lacquering. This gives gold, silver, antique brass, black, gunmetal and coloured finishes. At Polkom all metal finishes are nickel free, which is especially important for products that touch the skin. A final protective lacquer protects the finish from abrasion during setting and washing.
7. Quality control
Before packing, the eyelets are checked against several criteria:
- dimensions – outer and inner diameter, neck height, flange thickness;
- the fit of the eyelet with the washer;
- evenness and adhesion of the finish;
- a test setting on a material close to the customer's;
- a visual check for scratches, stains and deformed edges.
Eyelets with logo – what changes in production
For eyelets with a logo, the lettering or mark is stamped onto the flange with a die made specifically for the brand. The logo can be raised or debossed, around the whole circumference or in one sector. The die is made once and then used for every subsequent order. Before the production run the customer receives a sample to check the look of the logo, the finish and the setting on their own material.
What the production process means for the buyer
| Stage | What it affects | What to check |
|---|---|---|
| Material and thickness | strength and corrosion | whether the metal suits the environment of use |
| Drawing and neck | setting in the fabric | neck height relative to the material thickness |
| Washer | whether the eyelet holds | that the washer comes from the same batch |
| Polishing | wear on the cord | whether the edge of the hole is smooth |
| Finish | colour and durability | resistance after washing and setting |
For the buyer the conclusion is simple: the quality of an eyelet is not visible from its colour alone. Two eyelets that look the same can behave quite differently during setting if one has been drawn in more steps, with a more even wall and with a washer produced in the same batch. So for a new article, ask for a sample and set it on the real material with your machine before you approve the production run. This way you check the setting, the finish and the look of the flange at the same time.
Eyelets are often ordered together with rivets and other metal accessories in the same finish, so that the product looks like a complete set.
Polkom – eyelets manufacturer
Polkom is a manufacturer of accessories for fashion, shoes and bags with over 30 years of experience. We make eyelets in round and oval shapes, in many sizes and finishes, with a standard flange or with the brand's logo. All products are OEKO-TEX® certified. Minimum quantities depend on the article and on whether a new die is needed. Send the size, the material of the product, the finish and the logo via the contact page – you will receive a sample and a quote.
Share this article